Math Moments – What do Dot Products Mean?

We have seen the power of the dot products between two direction vectors.  We have shown that the dot product between two perpendicular directions is zero.  We will review this in two dimensions, because it is easier to see. Using our head reference the nose direction in 2-D is N:(Dx, Dy) and the Left ear direction is L: (-Dy, Dx):

   N.N = (Dx, Dy).(Dx, Dy) = Dx2 + Dy2 = 1
   N.L = (Dx, Dy).(-Dy, Dx) = -Dx*Dy + Dy*Dx = 0

We have also seen that we can travel to any point in 2-D (x, y) by traveling in the N direction a distance SN and then turning left and traveling in the perpendicular L direction another distance SL:

    (x, y) = N*SN + L*SL

And then we used the power of the direction dot products to see what happens when we dot these direction vectors with any point (x, y) in the 2-D space:

   N.(x, y) = N.(N*SN + L*SL) = N.N*SN + N.L*SL = 1*SN + 0*SL
                  = SN

    L.(x, y) = L.(N*SN + L*SL) = L.N*SN + L.L*SL = 0*SN + 1*SL
                 = SL

Written in concise dot product notation:

      [N, L].(x, y) = (SN, SL)

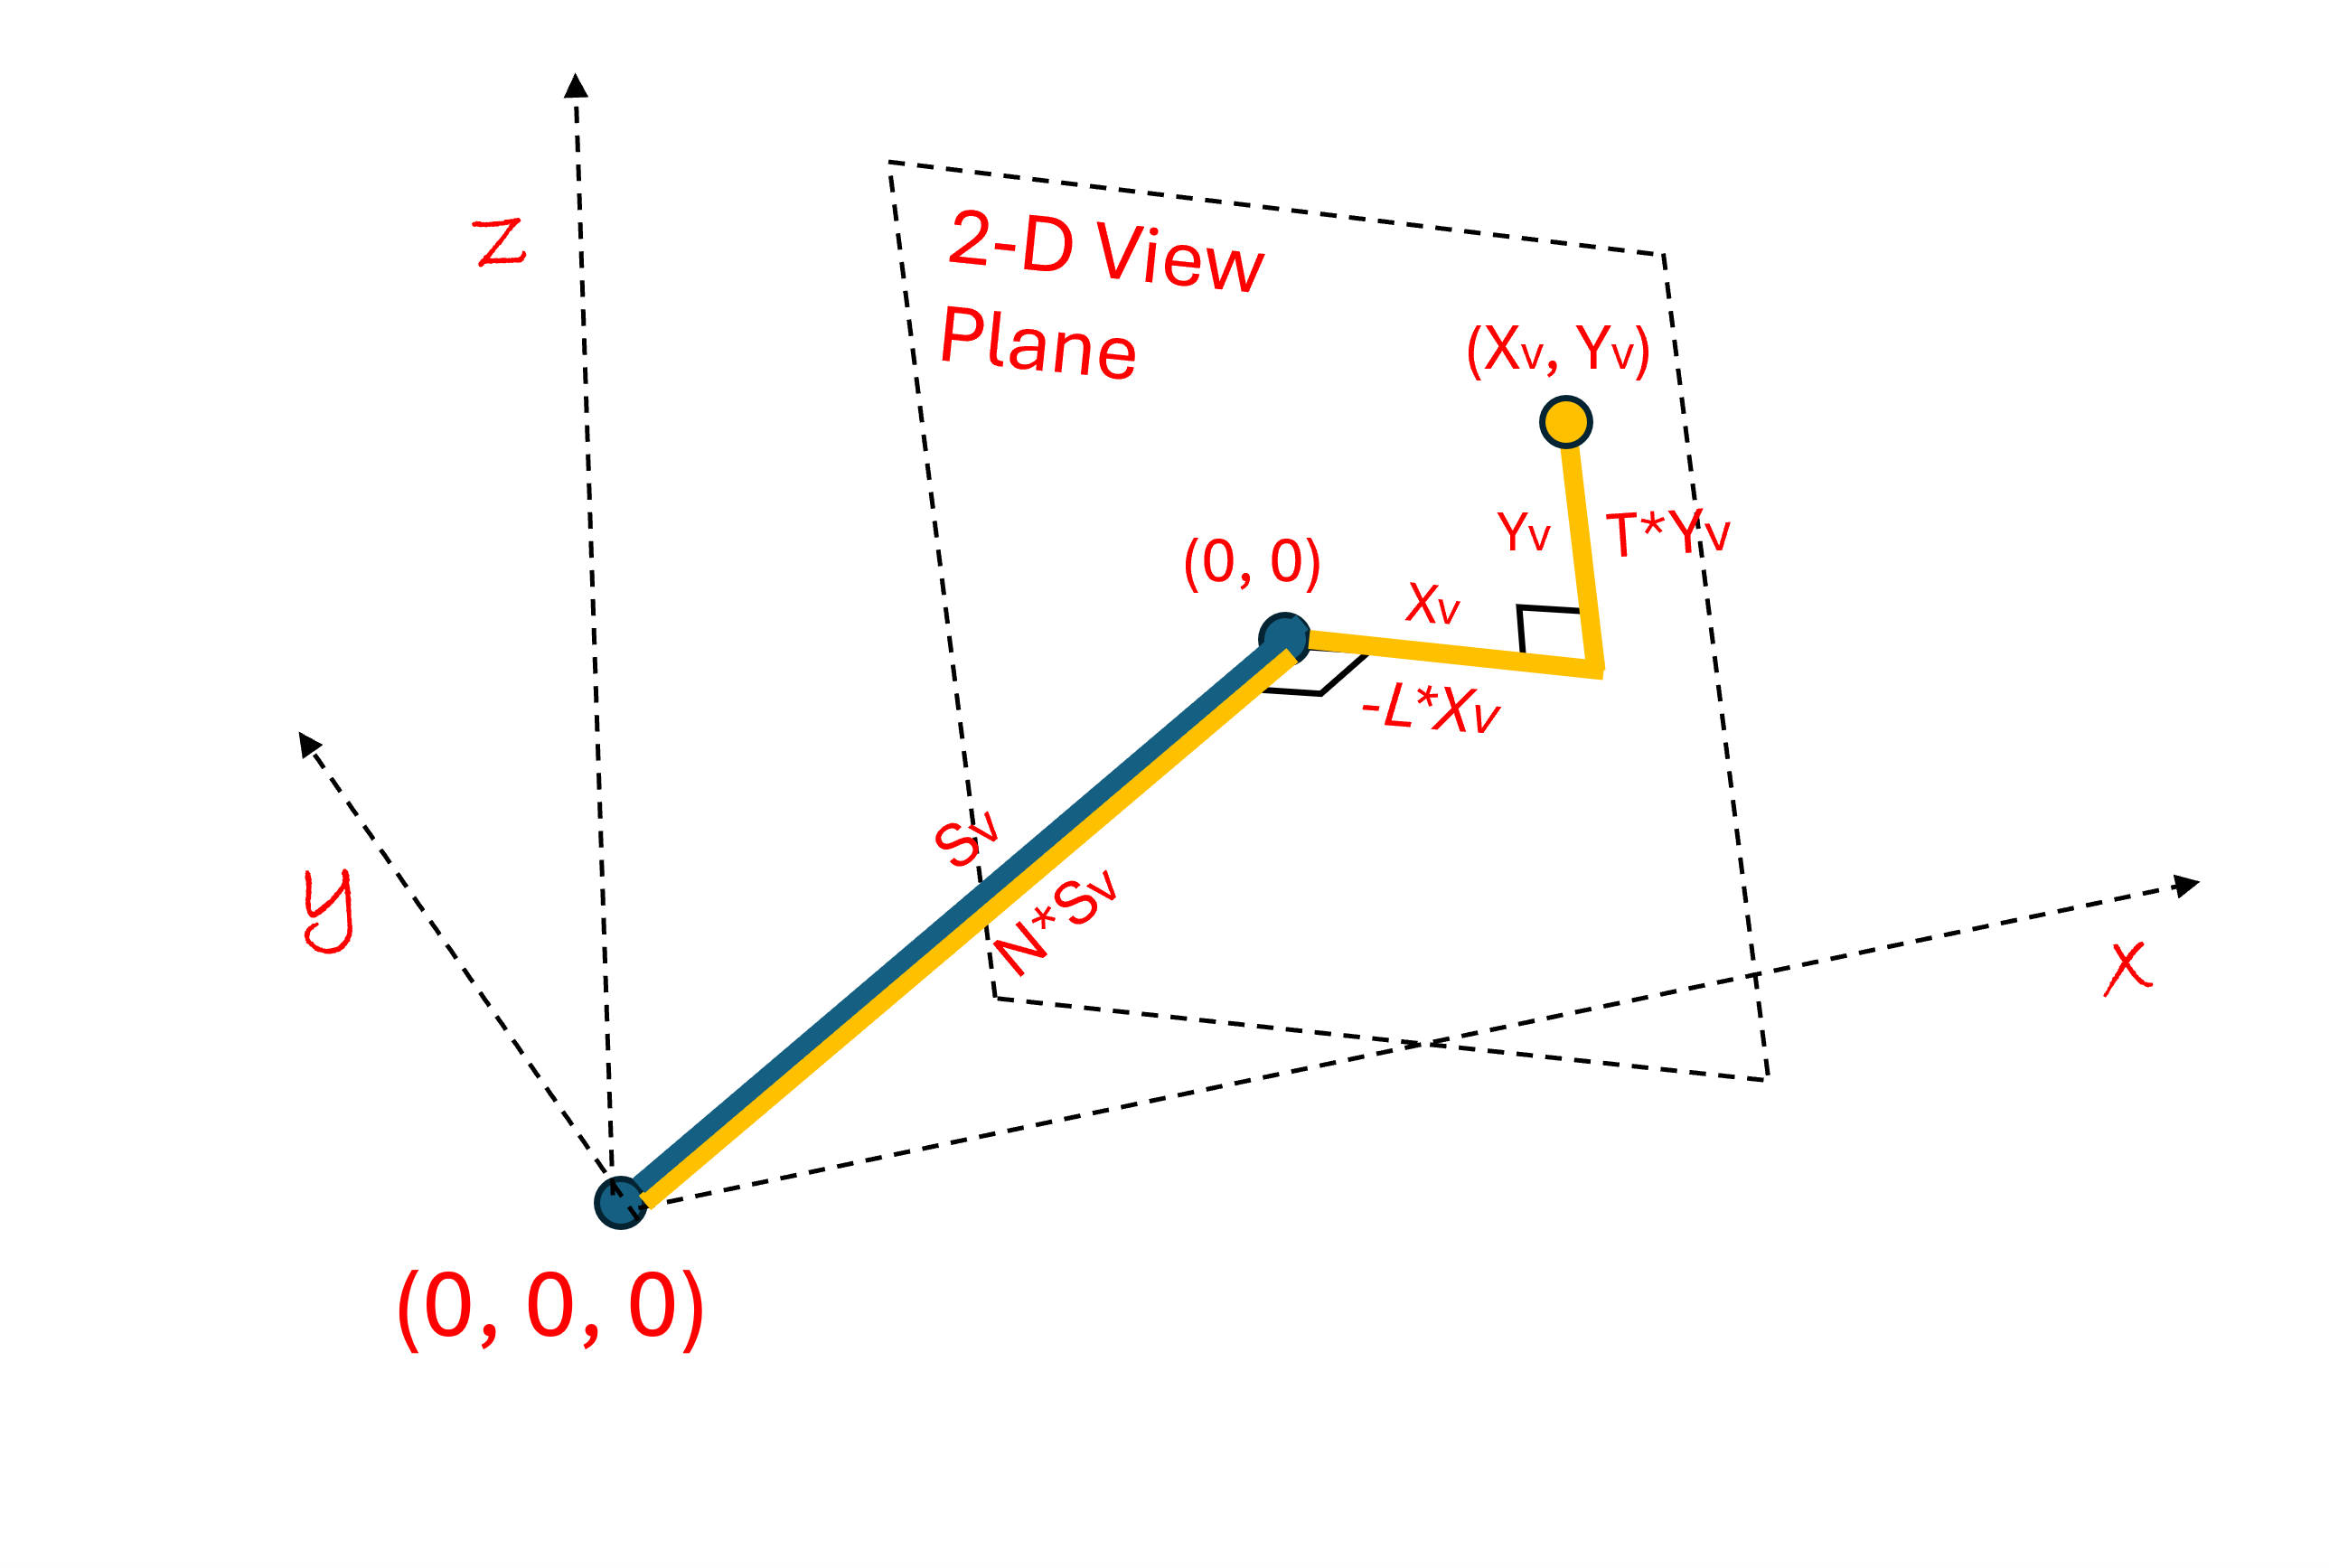
This means that dotting these “head direction vectors” (N, L) with any point gives you back the coordinates of the point in the “head frame of reference” (SN, SL), the distance traveled in the Nose direction and the distance traveled in the Left direction to arrive at the point.  From the last post, in 3-D, we saw that SN is the distance from the Nose to the perpendicular View Plane where the point lives.

We can conclude that in any dimension, if we dot the Nose direction (N) with any point we get back the “nose coordinate” in the “nose frame of reference” (SN):

     N.(any point) = SN

It might take a few moments of thought for this to sink in, but when it does, we start to realize that we can convert any point into the “nose frame of reference” no matter where our nose is pointing.  It is like rotating the reference frame into any direction we want and converting the coordinates into this “nose frame of reference”.

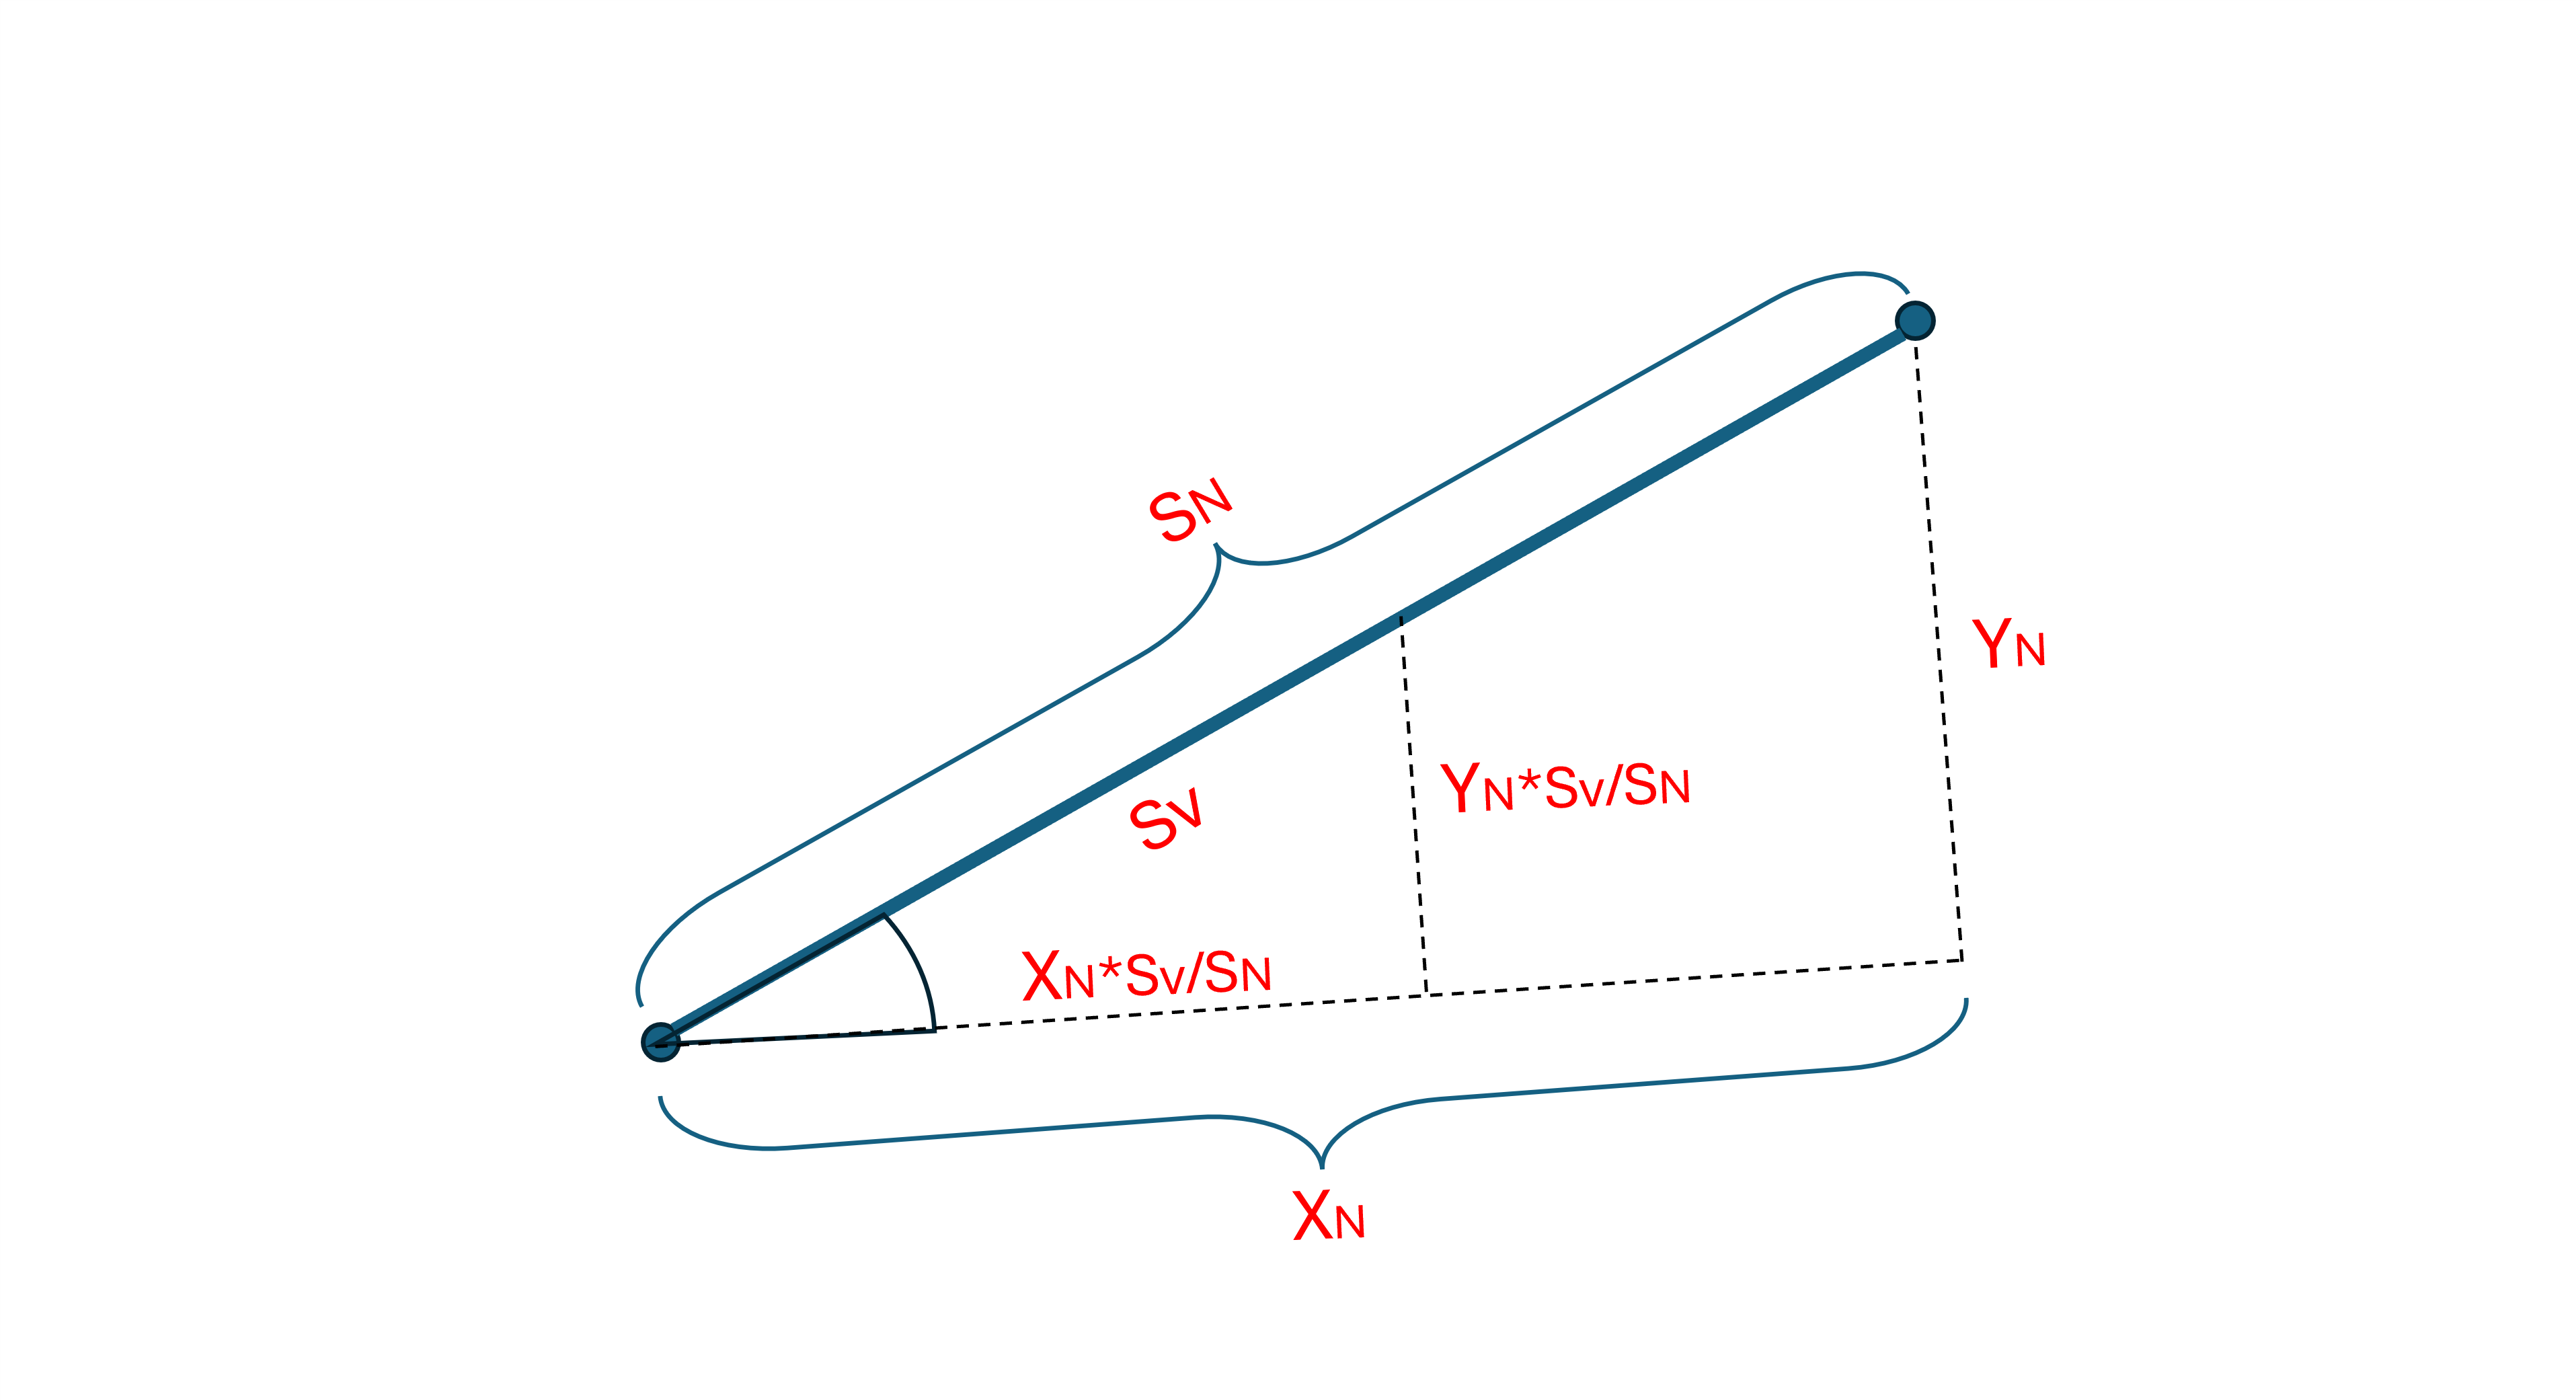
We might ask what happens when we dot two direction vectors together that are not perpendicular.  Suppose we have two Nose directions (N1 and N2) in 2-D:

   N1 = (Dx1, Dy1)
   N2 = (Dx2, Dy2)

Since any point (x, y) can be expressed in the N1 frame of reference, (Dx2, Dy2) can also be written in the N1 frame:

  (x, y) = N1*SN + L1*SL
  N2 = (Dx2, Dy2) = N1*SN + L1*SL

Refer to the diagram above for clarification.  Now we can easily see what happens when we dot N1.N2:

    N1.N2 = N1.(N1*SN + L1*SL) = N1.N1*SN + N1.L1*SL
               = SN

Now from the diagram we also can see that SN is just the Cos(A) because the length of N2 is 1, where A is the angle between the two directions:

   N1.N2 = Cos(A)

So, when we dot two direction vectors together, we get the Cosine of the angle between them.  This is consistent with what we have seen, because when the two directions are the same, A = 0 degrees, and when they are perpendicular, A = 90 degrees. Cos(o) = 1 and Cos(90) = 0 this is consistent with what we have shown when dotting direction vectors together so far.

   I have earned some good money from knowing this.  On one occasion, a ship captain wanted me to find the distance between two points in the ocean given the longitude and latitude of each point.  Recall that the longitude and latitude is the same as the “head direction” as seen from the center of the earth. (Axy1, Az1 and Axy2, Az2).

I realized that if I could find the angle between these two “head” directions (A), I could find the distance between the two points along the surface of the earth.  Since I know that the circumference of the earth (CE), the distance between the points is CE*(A/360).  I found N1 (the direction vector to the first point) and N2 the direction to the second point, dotted them together to find the angle: N1.N2 = Cos(A), and took home a large check (he still uses it to navigate).  Could you fill in the details?

Standard

Math Moments – How to Project 3-D on a 2-D Flatscreen

No matter where we turn our head in our 3-D world, we see the world projected on the 2-D “screen” in the back of our eyes.  These days, flat screens and cell phones are everywhere, they can display 2-D images on a flat surface that our brain interprets as being projections into a 3-D world.  From the last post, we are now equipped with math language to describe how this projection works.

We can imagine that everything we see in front of our face is displayed on a big flat screen that is always a certain fixed distance in front of our nose and moves around with our head (it could be transparent).  Let’s call this screen the “View Plane” and say that it is always placed a fixed distance (SV) perpendicular to our Nose direction (N).  This is not hard to imagine, I see lots of people carrying their cell phones around like this in front of their face all the time.

Your personal reference point (0, 0, 0), the origin, is always between your ears, the Nose direction (N), always points straight out in front of your face, the Left Ear direction (L) always points in the direction of your left ear, and the Top of head direction (T) always points through the top of your head.  This personal reference frame moves as you change the orientation of your head.

Since the View Plane in front of you is 2-D, every point on this screen can be located on a 2-D “xv-yv plane”.  Let’s draw such Cartesian coordinates on our View Plane. We choose the origin of the View Plane (0, 0) to be where our Nose direction (N) passes through the plane. We can choose the xv-axis on the plane to point to the right (opposite the L direction), and then the yv-axis would point in the Top of Head direction (T).

A single point (pixel) on this 2-D view screen (xv, yv), with a color (cv), can also be located in the 3-D world.  Start at the origin (0, 0, 0), the middle of your head, then travel a distance Sv in the N direction to arrive at the origin of the View Plane (0, 0), then from there travel along the xv-axis (in the negative L direction) a distance xv, and then along the yv-axis (in the T direction) a distance yv.  From our orienteering days, we already know how find this 3-D point in math language:

    (x, y, z) = N*Sv + (-L)*xv + T*yv
                   = [N, L, T].(Sv,-xv,yv)

And so, we can find the 3-D coordinates for any point on the 2-D View screen (xv, yv) when we know the distance to the view screen (Sv) and the orientation of the head (N).  In review, the middle of the head is always at the origin (0, 0, 0) and you are looking in the Nose direction N:(Dx, Dy, Dz) in the 3-D world, the direction vectors of the head reference frame are:

         N = (Dx, Dy, Dz)
         L = (-Dy/Dr, Dx/Dr, 0)
         T = (-Dx*Dz/Dr, -Dy*Dz/Dr, Dr)

         Dr2 = Dx2 + Dy2

In the Cartesian frame of the 3-D world around us the orientation of our head can be determined by two angles (Axy and Az).  As you remember, Axy is the angle we have rotated our head left or right in the x-axis in the x-y plane, and Az is the angle that we have tilted our head up or down off the x-y plane.  In review, the direction vector of the head is found from the following:

       Dx = Cos(Axy)*Cos(Az)
       Dy = Sin(Axy)*Cos(Az)
       Dz = Sin(Az)

The dot products of the [N, L, T] head reference vectors are:

   N.N = L.L = T.T = 1
   N.L = N.T = L.T = 0

since they are all perpendicular to each other.
We also find that:

     N.(x, y, z) = N.( N*Sv + L*(-xv) + T*yv )
                        = N.N*Sv + N.L*(-xv) + N.T*yv
                        = 1*Sv + 0*(-xv) + 0*yv
                        = Sv

     L.(x, y, z) = L.( N*Sv + L*(-xv) + T*yv )
                        = L.N*Sv + L.L*(-xv) + L.T*yv
                        = 0*Sv + 1*(-xv) + 0*yv
                        = -xv

     T.(x, y, z) = T.( N*Sv + L*(-xv) + T*yv )
                        = T.N*Sv + T.L*(-xv) + T.T*yv
                        = 0*Sv + 0*(-xv) + 1*yv
                        = yv

Another way of writing these stacked equations with dot products is simply:

      [N, L, T].(x, y, z) = (Sv, -xv, yv)

So, we can see that with this miracle matrix [N, L, T] can map a point in 3-D space onto a point (xv, yv) on a View Plane that is a distance Sv away.

Let’s finish this idea off.  Suppose we have any point in 3-D space (x, y, z), then

[N, L, T].(x, y, z) = (SN, -xN, yN)

maps (x, y, z) onto a point (xN, yN) on 2-D view plane that is a distance SN away from your nose.  Using simple geometry, this point can be mapped onto a point (xv, yv) in any parallel View Plane that is a distance Sv away by using:

    (xv, yv) = (xN, yN)*Sv/SN

And so, we can map a 3-D world onto a 2-D view plane.  Our brain perceives these 2-D images from colored points (pixels) from our flat screens as 3-D images.

Standard

Math Moments – Drawing Lines

If we want to show a computer how to draw lines in a virtual world (using a 2-D cartesian grid), then the best tools are things called parametric equations.  When drawing a line, the 3 parameters we need are:
(1) the starting point: (x0, y0), (2) the direction of the line: Dx, Dy, and (3) the length of the line: S.
The “parametric equations” that draw a line are written like this:

    x = x0 + (Dx * S)
    y = y0 + (Dy * S)

where x and y mark the point where the “pencil” is placed on the grid when drawing the line. Notice how “symmetrical” the equations are. Can you guess what the “z” coordinate would look like for drawing lines in 3-Dimensions?

We will learn how to find the Dx, Dy direction parameters later. Notice that plugging S = 0 in the equations above sets the “pencil” at the starting point (x = x0, y = y0).  When S = 1, the pencil has moved a distance of 1 unit away from the starting point, a distance Dx in the x-direction and a distance Dy in the y-direction. The pencil is now at the point (x = x0 + Dx, y = y0 + Dy), as seen when plugging S = 1 into equations. See the diagram above. Since the “pencil” has moved a total distance of 1 unit in total, we know from the Pythagorean theorem that:

   Dx2 + Dy2 = 12.

To draw our first line, let us first look at the simplest example: drawing the side S3 of the triangle in the diagram.  Note that we have changed the diagram a bit from previous posts, here we use the symbols x3 and y3 to specify the point P3:(x3, y3) and we now name the symbols x and y to mark the point where the pencil is drawing the line on the grid.

We picked the grid so that the line segment S3 lies along the x-axis. If we start at the point P1:(0, 0), then the starting point parameters are: x0 = 0 and y0 = 0.  This line segment ends at the point P2:(S3, 0), where x = S3, y = 0, and S = S3.  Thus, plugging these values into the parametric equations gives us:

     x = S3 = 0 + (Dx * S3)
     y = 0 = 0 + (Dy * S3)

It is not too hard to see that Dx = 1 and Dy = 0. And so, the complete parametric equations, with these parameters are:

     x = 0 + (1 * S) = S
     y = 0 + (0 * S) = 0

Let’s try this out. Remember, the point (x, y) determines the point where the “pencil” is drawing the pixel on the computer screen. To draw the S3 side you start with S = 0, where the “pencil” is at point P1:(0, 0) and then increase the length of the line, S, by one pixel length, compute x and y and draw in the next pixel at the point (x, y).  You keep on increasing S one pixel length at a time and drawing in pixels until the total length of the complete line segment is S3, when S = S3, you have reached the point P2:(S3, 0) and the S3 line segment is complete.

Note that you could also draw the line by putting your pencil on starting point P2 and drawing in the negative direction until you reach P1.  Since you are drawing in the negative direction, this time the parameter x0 = S3 and Dx = -1. Plugging these into the parametric equation for this line segment:

   x = S3 + (-1 * S) = S3 – S
   y = 0

Try it out.  When S = 0, your pencil is at P2:(S3, 0).  As S increases, the line is growing in the negative direction until S = S3 and then x = S3 – S3 = 0 at P1:(0, 0).  The same line segment has been drawn backwards.

Things get a little more interesting when finding the parameters to draw the side S2.  Let’s start at P1:(0, 0) and draw a line segment S2 to P3:(x3, y3).  As before, at the starting point P1, x0 = 0 and y0 = 0.  Things get just a bit more interesting when trying to find the direction parameters Dx and Dy.  The parametric equations are:

     x = 0 + (Dx * S) = Dx * S
     y = 0 + (Dy * S) = Dy * S

and at the endpoint P3, the parameters are S = S2, x = x3 and y = y3. Plugging them in:

    x = x3 = Dx * S2  and so Dx = x3/S2
    y = y3 = Dy * S2 and…     Dy = y3/S2

Note that: Dx2 + Dy2 = x32/S22 + y32/S22 = (x32 + y32)/ S22 = 1, recall that x32 + y32 = S22 from the Pythagorean Theorem and everything checks out.

Finally, the parametric equations can be written:

     x = (x3/S2) * S
     y = (y3/S2) * S

Now, in the last blogpost, we saw that the definition the Cos(A1) and Sin(A1) were:

Cos(A1) = x3/S2
Sin(A1) = y3/S2

These are exactly what you see in the equations above, Thus, the parametric equations for the line segment S2 are:

       x = Cos(A1) * S
y = Sin(A1) * S

Where S goes from 0 to S2. Quickly, if we want to draw this line in reverse, from P3 to P1, then our starting point is (x3, y3), moving in the negative direction, thus:

      x = x3 – Cos(A1) * S
y = y3 – Sin(A1) * S

Again S goes from 0 to S2.

The equations above will also draw circles.  If you keep the distance (S) constant and vary the angle (A1) from 0 to 360 degrees, the (x, y) “pencil” will sweep out all the points on a circle that are a radius S away from the center (x0, y0).  This is an extra bonus.

For reference, below are the general parametric equations for drawing both lines and circles:

       x = x0 + Cos(A1) * S
       y = y0 + Sin(A1) * S

If you want to draw lines, vary S.  If you want to draw circles, vary the angle A1.

Our last task is finding the parametric equations to draw the last side, S1.  Let’s start at the point P2:(S3, 0) and go to P3:(x3,  y3).  And so, our starting point is x0 = S3 and y0 = 0.  We just need to find the Dx and Dy parameters.  We can find these by looking at the parameters at the ending point, x = x3 and y = y3, and S = S1, thus:

     x3 = S3 + (Dx * S1)   thus   Dx = (x3 – S3)/S1
     y3 = 0 + (Dy * S1)    thus   Dy = y3/S1

If we want to write Dx and Dy in terms of the angle A2, then we need to find expressions for Cos(A2) and Sin(A2). Looking at the diagram, the triangle in the left dashed box has a base of length x3 and the side S2, forming the angle A1.  In the right dashed box, the triangle has the base length S3-x3, with the side S1 that form the angle A2.  The left and right triangles face each other and are joined by the common height length y3.  If we map out the corresponding parts of the left and right triangles:

Left –> Right
    x3 –> (S3-x3)
    y3 –> y3
    A1 –> A2
    S2 –> S1

                                    Thus

Cos(A1) = x3/S2  –> Cos(A2) = (S3 – x3)/S1
Sin(A1) = y3/S2   –>  Sin(A2) = y3/S1

This idea of mapping is very powerful, especially when it is used to change perspectives from one frame of reference to another.  In this case, it gives us the desired expressions that we need to draw the line segment S1 in the perspective of the angle A2. Below are the resulting parametric equations, with Dx and Dy as found a few paragraphs ago:

   Dx = (x3 – S3)/S1 = -(S3 – x3)/S1 = -Cos(A2)
   Dy = y3/S1 = Sin(A2)

Thus

     x = S3 + (-Cos(A2) * S) = S3 – (Cos(A2) * S)
     y = Sin(A2) * S

Check it out!  After a little practice, finding the parametric equations for lines and circles becomes very easy to do, much easier than other methods.

 One huge advantage of using these parametric equations is that the parameter S in these equations is the actual distance of the point (x, y) from the starting point (x0, y0).  At times, this is convenient when measuring the distance between points along a given angle.  Some examples of this will be given in later posts.  It makes geometry problems so much easier.

Standard